|
Note 64-bit operating systems are recommended if you are working with large datasets, point clouds, and 3D modeling - please refer to the AutoCAD Architecture 2015 System Requirements for 64-bit Workstations for more information. System requirements for AutoCAD for Mac 2012 Determining the model of your Mac The AutoCAD for Mac system requirements refer to a model identifier when describing the minimum or recommended Mac models to use with AutoCAD for Mac.
0 Comments
Keyshot 8 Crack + Keygen Torrent 2019 Free Download Keyshot 8 is a 3D that is advanced and animation application that provides everything you need to create fast, accurate and incredible visuals in real-time. The program supports all 3D common from the most popular 3D applications. It features a real-time workflow bundled an easy-to-use interface allows you to render shot that is perfect. Advanced technology that is presenting has advanced material editing, and animation, the specific material, and environment present. All changes to the camera, lighting, and materials can be viewed in real-time. Keyshot Crack is of which includes HD features, Animation, Scripting, Studios, Camera The Pro and Enterprise version allows adjusting lighting that is physical apply textures, photorealistic images, etc. More details are available from Apple’s and Apple’s iPhone, iPad, and for trade-in and recycling of eligible devices. Compare Photoshop versions - Adobe Photoshop Comparison - CS5.5 CS5.1 CS4 CS3 CS2 CS. Adobe Creative Suite 6 and Photoshop CS6 Availability and Upgrade Policy Clarified. Adobe Makes It Official – Special Introductory Upgrade Prices on Creative Suite 6 CS6. Mac OS and Windows®. Photoshop CC is $240 a year, where Photoshop CS was $200 every 18 months. For users who don’t have Photoshop, Creative Cloud becomes more expensive after six years, and after those six years the software is still not owned by the user and goes away if the user does not pay. Contents • • • • • Football Manager 2017 Torrent cracked PC Game Full Version Football Manager 2017 Crack Torrent is also known and abbreviated to FM 17. This video game is football management simulation video game that is developed by Sega and Sports Interactive. The latest version of this software was released recently on 4rth of November 2016. Get Excel for Mac add-ons by Ablebits to cope with daily tasks easily. Apps for Excel for Mac Add-ins by Ablebits are designed to help you with everyday worksheet tasks in Excel 2016 for Mac, desktop version of Office 365 for Mac, and Excel 2011. Excel Add-ins for Excel for the Mac. FileName Lister Add-in for Excel 2016 for the Mac Briefly! FileName Lister is a user friendly way to get a list of file names into a new Workbook. 
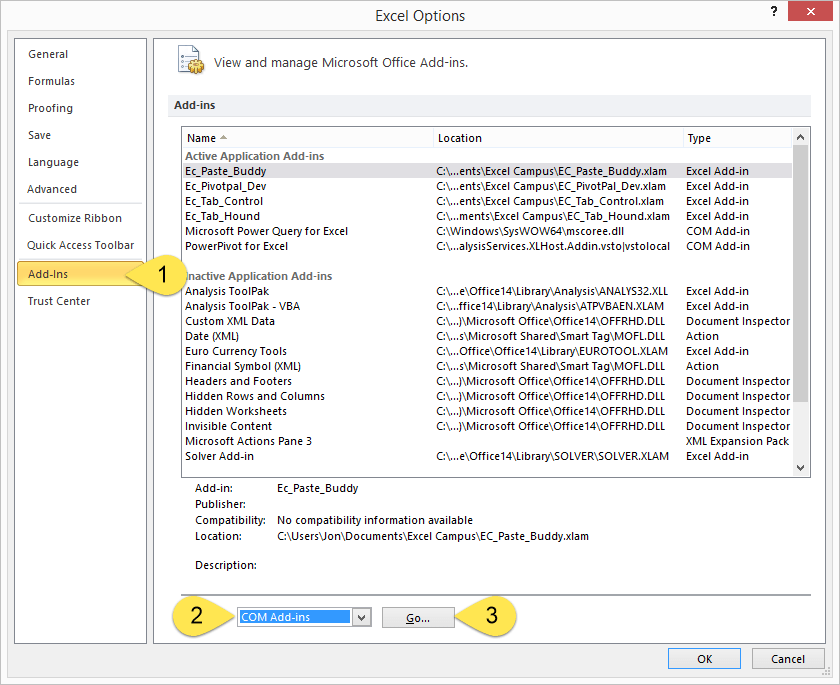
3ds emulator for mac os x. Hi Jake, I understand that your Excel add-ins are not showing up in Excel 2016. I suggest you to start Excel in safe mode and check if it helps. To do that, close Excel. Click on Start> All Programs> Accessories> Run, and in the open box type in Excel /safe and hit ok. Note: There is a space between Excel and /. If the application works fine safe mode, try disabling the add-ins for the application and check the result: • Click on the File tab. • Go to Options. • Click Add-ins. • In the Manage section, select COM Add-ins and click on Go. • Now uncheck the Add-ins and click on OK. For more information, you may refer to the following article and check: Please post to us if you need any further assistance and we will assist you. Here are two possible explanations. (A) If you are using an Excel VBA add-in which correctly uses the pre-2007 methods for adding a custom tool bar or menu item, and if it is correctly installed, then there will be an 'Add-Ins' tab added to the ribbon with a 'Menu Commands' group. In Windows Excel 2013 and 2016, after you click the checkbox in the Add-ins Available list, the Add-Ins tab may not appear until you quit Excel and restart. Instead, if your add-in creates a 2007-and-later ribbon and does not use the pre-2007 methods, then Excel will not show an 'Add-Ins' tab. (B) Microsoft added some extra security features in July 2016. Depending on your system and settings and file location, you may have to unblock downloaded files before use. In your Windows file manager, right-click the XLA or XLAM file, choose Properties > General, check the Unblock box, and click OK. Then start Excel and use File > Open to load the add-in file. 
Line App: How to use If you have Apple MAC check this app will surprise you:http://bit.ly/OneChatFREE1. Quickbooks windows to mac conversion. 
Dji assistant 2 download for mac. • Check how many LINE Out Free calls you can make today in the Calls tab. Add ins avfor excel for mac 2011. • Purchase Call Credit or a 30-Day Plan to make calls to countries besides Japan, Indonesia, United States, United Kingdom, Australia and New Zealand., • Calls cannot be made to the following: • Emergency numbers, including the police, fire department, or ambulance. • Some paid or premium call services. • Businesses without connection agreements with LINE. • LINE Out is available to users registered to LINE in the following countries: • Asia: India, Japan, Malaysia, Philippines, and Thailand • Europe: Turkey • North and South America: Argentina, Chile, Colombia, Mexico, Peru, and the United States • Oceania: Australia and New Zealand LINE Corporation Link. Why a GParted live USB drive? You may be wondering what is the need to create a live USB drive when you can install GParted right away in my Linux. The answer is simple. You can’t resize an active partition from which you have booted your computer. By using a GParted live USB drive, your hard disk is free to use and you can have freedom to resize and partition easily. Create GParted Live USB drive on Ubuntu, Linux Mint, elementary OS, and derivatives STEP 1: Download GParted Live ISO from. There are 32-bit and 64-bit versions available. STEP 2: Insert a blank USB flash drive to your PC. I recommend a minimum of 512 MB capacity. Adobe acrobat update for mac. Intuitive form creator: Our favorite feature is the ability to create forms that other users can fill out and return. If you need to protect your files, you can also apply extra security options such as passwords and permissions in other applications, as well as set permissions directly in your PDF to prevent unauthorized copying of your data. Cartload of features: You can combine multiple PDFs just by dragging and dropping files into a window, edit existing PDFs with just a few clicks, add text, change text, play around with the font of existing PDFs, and even save PDFs as Word or Excel files without any hassle.
STEP 4: Select the USB flash drive in the left pane of ‘Disks’ window and then click on the ‘Navigation’ icon located on the right side. Select ‘Restore Disk Image’. Restore Disk Image STEP 5: Browse and select the GParted Live USB ISO file which you had downloaded in STEP 1. STEP 6: Click ‘Start Restoring’. Start Restoring STEP 7: Confirm and enter root password. Your GParted Live USB drive (also called GNOME Partition Editor) is now ready! You can boot into it right away to resize and partition your hard disk. Warning: Older versions of UNetbootin are known to produce non-booting USB sticks for recent Parted Magic ISOs. It is recommended therefore to use the UNetbootin version as provided by Parted Magic (hint: start the CD) or with your favorite Linux or Windows to download the current version from here and use that version *). Mar 31, 2015 ๑۩۩๑ Facing Cam: Or Ebay: Overhead Cam: Or Ebay: Handheld cam: https. Boot into GParted Live USB drive 1. Once you boot your computer into the USB live drive, you will see this window. Select the first option (highlighted by default) and hit enter key. GParted Live 2. In the next window, select ‘Don’t touch keymap’ and hit enter. Select Don’t touch keymap 3. 
Enter the language #. Finally, you will see the GParted user interface. You can select the desired partition and resize/create/format partitions. GParted User Interface Enjoy! I'm Kiran Kumar, founder of FOSSLinux.com. I'm an avid Linux lover and enjoy hands-on with new promising distros. Currently, I'm using Ubuntu as a daily driver and run several other distros such as Fedora, Solus, Manjaro, Debian, and some new ones on my test PC and virtual machines. I have a day job as an Engineer, and this website is one of my favorite past time activities especially during Winter;). When I'm not writing for FOSSLinux, I'm seen biking and hiking on scenic trails. Hope you enjoy using this website as much as I do writing for it. Feedback from readers is something that inspires me to do more, and spread Linux love! If you find a time, drop me an email or feedback from the 'Contact' page. Or simply leave a comment below if you found this article useful. Have a good day! Virtual ][ emulates the vintage Apple II computer on your Mac. You will be able to play the old games and use the old programs. Many disk images with Apple II programs are available on the web. 
The Problem RELATED: Apple’s made it difficult to boot non-Mac OS X operating systems off of USB drives. While you can connect an external CD/DVD drive to your Mac and boot from standard Linux live CDs and USBs, simply connecting a Linux live USB drive created by to a Mac won’t work. There are several ways around this. For example, Ubuntu offers some that involve converting the USB drive’s file system and making its partitions bootable, but some people report these instructions won’t work for them. There’s a reason Ubuntu recommends just burning a disc. Should allow you to boot those USB drives if you install it on your Mac. But you don’t have to install this alternative UEFI boot manager on your Mac. The solution below should allow you to create Linux live USB drives that will boot on modern Macs without any additional fiddling or anything extra — insert, reboot, and go. Use Mac Linux USB Loader RELATED: A tool named “” by SevenBits worked well for us. This Mac application will allow you to create USB drives with your preferred Linux distro on them from within Mac OS X in just a few clicks. You can then reboot and boot those USB drives to use the Linux distribution from the live system. Note: Be sure to move the Mac Linux USB Loader application to your Applications folder before running it. This will avoid a missing “Enterprise Source” error later. First, insert the USB drive into your Mac. Check that the USB drive is formatted with an MS-DOS (FAT) partition. If it isn’t, delete the partition and create a FAT partition — not an ExFAT partition. Next, open the Mac Linux USB Loader application you downloaded. Select the “Create Live USB” option if you’ve already downloaded a Linux ISO file. If not, select the “Distribution Downloader” option to easily download Linux distribution ISOs for use with this tool. Select the Linux distribution’s ISO file you downloaded and choose a connected USB drive to put the Linux system on. Choose the appropriate options and click “Begin Installation” to continue. With coverage of up to 5 devices for a 1-year license, this package is your best bet for ultimate antivirus and Internet Security measures. Enjoy added features like PC Tune-Up and protection for several operating systems such as Android OS and MAC OS, above a beyond all the antivirus engine features that come with the basic products. The price difference is ever so slight, but the value for your money is worlds apart when compared to Bitdefender's basic product bundles. Don't miss out one of the best antivirus products on the market today! Therapist software for mac. We serve individual and group practices comprised of psychiatrists, psychologists, counselors, therapists, social workers and other mental health professionals through the delivery of intuitive, affordable practice management software. Helper software addresses the continuum of practice needs, from billing, scheduling. Bitdefender for Mac is a product that shields PCs from viruses and other Internet dangers. It gives a 30 day free trial, so most users can without much of a stretch choose to have an attempt and introduce it on their Macs. All things considered, really the choice to ensure a Mac isn’t awful. Be that as it may, if the product sometimes falls short for you for a few reasons and you need to uninstall it, you may confront an issue – it isn’t so natural to uninstall Bitdefender. In the event that you enter the demand “How to uninstall Bitdefender” on Mac, you will see that a ton of users can’t uninstall Bitdefender totally We have arranged for you itemized instructional exercises of how to uninstall Bitdefender. In any case, to start with, you should realize that the evacuation steps rely upon which adaptation of the antivirus you use. Since its most recent refresh in June 2017, Bitdefender has changed its assurance framework. An extraordinary watching program has been actualized with Bitdefender, which reestablishes its administration files at whatever point you endeavor to expel them. It has a few ensuring things, which don’t enable the program to be uninstalled totally. Accordingly, any sandboxed uninstalling instrument can’t stop the Bitdefender’s forceful assurance framework. Be that as it may, don’t stress, we have explored this issue and have discovered an answer for you. Delete Bitdefender Antivirus with Uninstaller To evacuate Bitdefender Antivirus for Mac, please continue with the accompanying advances: • Limit any open windows and tap on a void space on the work area • Tap on Go from the menu bar and select Utilities or press Shift+Command+U.B You can likewise open Finder and go to Applications, at that point Utilities and run the BitdefenderUninstaller. Bitdefender Uninstall Tool is a removal utility for products issued by Bitdefender. This approach is recommendable especially when you are confronted with the impossibility to uninstall a. • On the other hand, tap on Go from the menu bar and select Computer. Go to Macintosh HD > Library > Bitdefender > Central > Agent and run the BitdefenderUninstaller.In the new window that will fly up, tap on Uninstall. • Affirm the procedure by entering the chairman secret key. The uninstalling will start. • At the point when the procedure is finished tap on Close. A website page will open requesting that you finish a review. Canon drivers for Windows®, Document Management & OCR Software Power Consumption (approx.). Canon offers a wide range of compatible supplies and accessories that can enhance your user experience with you imageCLASS MF4350d that you can purchase direct. Not MAC Compatible. Wireless Adapter. External print server that. ImageCLASS MF4350d Driver Download April 20, 2016 By Mochi Mochi ImageCLASS MF4350d Driver Printer Download for OS Linux, Mac, and Windows – The MF4350D device prints sharp monochrome text with resolution up to 1200 x 600 dpi for impressive clarity. Download Canon MF4320-4350 UFRII / UFRII LT Windows Drivers Support. A UFR II print driver is a Canon proprietary driver that stands for “Ultra Fast Rendering II.”. Canon ImageClass MF4350d Driver Download for OS Windows, Mac and Linux – Canon ImageCLASS MF4350d Laser All-in-One Printer, The MF4350d boasts print and copy speeds of up to 23 pages-per-minute (ppm) for letter-sized output, and delivers Quick First Prints or copy pages in approximately nine seconds. Canon 4350 printer driver. Canon imageCLASS MF4350d Drivers, Software, Download, Scanner, and Firmware For Windows 10, 8, 7, Mac OS Full and Free Compatible Canon imageCLASS. Your input would be tremendously appreciated. In the event that you don’t have sufficient energy, just close the page. • Go to Macintosh HD > Library and move the Bitdefender folder to Trash. You will be requested the director secret word once more. • On the off chance that despite everything you have the Bitdefender symbol in Dock, right-tap on it, select Options > Remove from Dock NOTE: The sweep logs and the Quarantine will be stay at Macintosh HD > Library > Application Support > Antivirus for Mac. On the off chance that you have vital files that have been isolated, it is important to reinstall Bitdefender with a specific end goal to get them back. Else, you may move to Trash the whole Antivirus for Mac folder. NOTE: The uninstaller will likewise expel Bitdefender Virus Scanner Plus or Bitdefender Virus Scanner on the off chance that they are introduced on your Mac alongside Antivirus for Mac. Search google doc for words with mac download. Use find and replace in a spreadsheet • On your computer, open a spreadsheet in. • Click Edit Find and replace. • To replace the highlighted word, click Replace. To replace the word every time it’s used, click Replace all.  .png "Bitdefender")
Uninstall Bitdefender Virus Scanner through Launchpad The most recent form of Bitdefender Virus Scanner can be introduced by means of Mac App Store. In the event that you download this app by means of App Store, it can be effortlessly uninstalled by means of Launchpad. • Tap the Launchpad symbol in Dock, and find Bitdefender Virus Scanner. • Hold down the symbol until the point that it starts to shake and show X on the upper left corner. In the 'Replace' field, enter a word or code (e.g., the first three or four letters of your entry) that you will use when creating documents. For example, enter your first name initial with the first three letters of your last name to create a code for your full name. Embed a “live” spreadsheet in Word • Open your word document, where your excel spreadsheet has to be placed. • Click on the Insert in the ribbon and select Object in the Text section. • Select the Create from file and browse to your excel document which has to be inserted. Editing an inserted Excel in Word • Double click on the inserted document. • Make necessary adjustments to make the table fit into your Word page. • If needed we can edit further inside the embedded excel sheet. Adding other files into Word We can also embed some other applications and edit them in word. Read further for the procedure. We’ve got you covered. Best mail app for mac os mojave. There are literally hundreds of thousands of great software applications compatible with MacOS in the App Store — not to mention the thousands more that are scattered across the web. • Open your word document and select the object in the insert ribbon. • In the create new option click on your desired application to make the application embed to word document. • For instance, if we need to embed a powerpoint presentation in word 2016. • Hit the PowerPoint presentation side in the object type and select OK. • Now we can edit with the new presentation slide embedded in Word 2016. Embedding spreadsheets in Word for MAC OS X If you are using Word for MAC OS X, you can insert existing spreadsheets into your documents as well. Procedure is similar to the one we outlined before for Windows. • Open Microsoft Word and navigate to your document. • Pick the location into which you would like to add your spreadsheet content. • Hit Insert, and select Object. • The following dialog will be opened: • Hit From file and select the Excel workbook that has the content you would like to embed. • Hit Insert. • Now go ahead and adjust the placement, height and weight of your embedded worksheet. • Once done, save your spreadsheet (File>>Save or Command + S). Note that on Word for MAC OSX you are not able to embed “live” Presentations; however you can embed other documents into your Word files. Recommended Next steps • Got additional related questions? Look into our. 
Add Excel Tables to a Data Model: Overview You can manually add Excel tables to a data model within a workbook. You can then use them as the data source for PivotTables, PivotCharts and Power View reports. Before doing this, however, first create the necessary tables within Excel. Also, to add Excel tables to a data model, ensure the information is formatted as a table in the worksheets. You can only add table data formatted as a table with a referenceable “Table Name” value to a data model. Also note, however, that the tables can be available within any opened workbook in Excel. They do not necessarily need to appear in the workbook into which they are added to the data model. First, open the tables to make them available in Excel Then open the workbook within which you want to add Excel tables to a data model. Then click the “Data” tab within the Ribbon. Click the “Connections” button within the “Connections” button group on the “Data” tab. Doing this then opens the “Workbook Connections” dialog box. This dialog box normally displays available workbook connections. It also displays where those connections are used within the workbook. To add Excel tables to a data model, click the drop-down to the right of the “Add” button in the “Workbook Connections” dialog box. From the drop-down menu that appears, select the “Add to the Data Model” command. When you do this, the “Existing Connections” dialog box appears. Click the “Tables” tab within the “Existing Connections” dialog box. A list of the available Excel tables within any opened workbooks then appears. Select the desired table to add to the data model. Then click the “Open” button to add that table to the data model within the workbook. The table reference then appears within the “Workbook Connections” dialog box. Add Excel Tables to a Data Model- Instructions: A picture of the “Workbook Connections” dialog box in Excel, showing references to Excel tables in the data model. Repeat this process by clicking the “Add” button’s drop-down menu again. Repeat the same steps again to continue adding Excel tables to a data model. 
When finished, click the “Close” button within the “Workbook Connections” dialog box to close it. You can then select the data model as the data source when creating PivotTables and PivotCharts. Mac os shell for windows. Within the “Create PivotTable” or “Create PivotChart” dialog boxes, select the “Use an external data source” option button. Then click the “Choose Connection” button to open the “Existing Connections” dialog box. Select the “Tables” tab. Then click the “Tables in Workbook Data Model” choice in the “This Workbook Data Model” shown. Then click the “Open” button to return to the “Create PivotTable” or “Create PivotChart” dialog boxes. Finally, finish creating the desired objects. Add Excel Tables to a Data Model: Instructions • Open the Excel workbooks that contain the Excel tables to add to the data model. |
AuthorWrite something about yourself. No need to be fancy, just an overview. ArchivesCategories |
 RSS Feed
